
Success in woodworking depends a lot on precision. Power tools might look like the first choice for someone new, but hand tools bring a level of control and accuracy that can elevate your work.
Imagine what our ancestors managed to build with just basic tools. They created everything from simple boxes for keeping things to stunning pieces of furniture. Woodworking gives you the chance to design and make one-of-a-kind items that show off your imagination. As someone just starting out, you don’t need a huge pile of tools to begin. , having a few important hand tools for woodworking can get you a long way. The great thing is you can begin with the basics and add more tools as your skills grow.
If you want to build a small birdhouse or something bigger like a dining table with chairs starting with the right woodworking hand tools matters a lot. Using a marking knife creates accurate marks to guide your cuts, and chisels help you adjust joints to ensure they fit just right. Knowing which tools new woodworkers should buy first can help you avoid wasting time, money, or effort.
Follow this step-by-step guide to choose the hand tools you need for your setup. Let’s dive into your woodworking adventure!
Disclaimer
Affiliate Disclaimer
I want to be 100% honest with you. Some links you see in my post are ‘affiliate links’. This just means if you click one of my links and then buy a tool, I get a very small money from the shop.
This does not cost you any extra money at all. The price is the same for you.
This small help lets me keep this blog alive and test more tools for you. Please know, I only link to tools I have used myself or received a verified review of the tool and believe are good. My words and my review are my own, nobody pays me to say nice things. Thank you for your support!
Image Information
All product images used in this post are provided by the author and claimed to be their own usage. According to the author, these images are either self-clicked, taken during hands-on testing, or screenshots captured for review purposes. If you believe any image violates your rights, please contact us for proper credit or removal.
Price & Stock Information
The product prices and availability mentioned in this post are accurate as of the time of publishing. However, prices may change on the seller’s website without notice. Please always check the latest price and stock status on the official product page before making a purchase decision.


Recent Posts
- Makita XFD131 Review: Should You Buy This Drill?
- Corded vs Cordless Tools 2025: Which Costs Less?
- 7 Best Cordless Drills That Are Worth Buying
Learn Why Hand Tools Matter in Woodworking
Hand tools have played a central role in woodworking for hundreds of years. They let craftspeople work with their materials in ways that power tools just cannot. From shaping fine joints to smoothing surfaces, these tools still hold value even in today’s tech-heavy world.
Why do hand tools still matter?
Even in a time when mass-produced furniture is designed to last “a move or two,” hand tools give skilled workers the ability to build items that endure for generations. Old-school woodworking tools support methods like dovetail, mortise and tenon, and tongue and groove joints. These techniques ensure strength and longevity.
People often think power tools are always faster, but that’s not true for every job. Hand tools can save time in some cases. For instance, making a single mortise and tenon joint is often quicker with hand tools than setting up all the gear and jigs needed for power tools. A seasoned woodworker once said, “I’ve watched others spend an entire day building a jig just to make a wood joint, while I could have finished the joint in just a few minutes with hand tools.”
Using hand tools also gives you a chance to slow down and step away from the rush and noise of modern life. Many woodworkers say traditional tools let them relax and feel more in touch with what they are creating.
How hand tools are not the same as power tools
The way these tool types work is what sets them apart. People use hand tools without needing electricity or batteries. Power tools, on the other hand, depend on external power to run. This key difference shapes how they are used.
Hand tools let users work with more precision and control compared to power tools. The direct interaction between the user and the material makes it possible to create detailed intricate designs. Power tools often can’t match this level of detail.
Hand tools also tend to need less upkeep. Since they have no motors or parts that might break, a well-cared-for hand tool can last for decades. Some woodworkers still use vintage hand tools handed down through their families.
Hand tools help make a quieter workspace. Without the loud motor noises of power tools, woodworkers can give full attention to their craft. Less noise suits home workshops well since it avoids bothering others nearby.
Why beginners should try hand tools
To start woodworking, using hand tools gives some clear benefits:
- Learning new skills – Using hand tools helps people build basic woodworking knowledge. Beginners sharpen their hand-eye coordination, grow more patient, and understand wood grain and how it behaves as they practice.
- Staying safe – Hand tools do not have fast-spinning blades moving at thousands of miles per hour, which makes them less risky for beginners. This gives new woodworkers confidence while they are still trying to improve their skills.
- **Saving money and starting ** – A simple set of hand tools costs less than power tools. This makes it easier and cheaper for beginners to try woodworking without needing to invest a lot right away.
- Space efficiency – People who have small workshops can benefit from using hand tools since they take up less room compared to big power tools. A space as small as 10 by 10 feet can fit an entire setup for hand tools making woodworking possible no matter how little space you have.
- Less dust created – Hand tools make curls and shavings instead of fine dust. This keeps the workspace tidier and the air healthier. This is useful to work in spaces linked to where people live.
At its core, hand tools let beginners experience the true nature of woodworking. Newcomers learn how wood reacts to each tool through touch gaining insights into the material’s traits that will guide them as they continue working with wood.
Measuring and Marking Tools You Should Have
Exact measurements are key to building great woodworking projects. Without precise marking and measuring even the best woodworker cannot achieve high-quality results. Here is a look at the basic measuring and marking tools beginners should have when starting out.
Choosing the right tape measure
In woodworking, a tape measure is one of the first tools you’ll need. Woodworkers working in a shop get by with a 15-foot tape because longer measurements are necessary. On the other hand, construction tasks may call for tapes that go up to 25 or 30 feet.

- 16-foot retractable measuring tape for personal or professional use
- Provides both SAE and metric measurements
- Wide 3/4-inch blade with easy readability
Think about these important points when choosing a tape measure:
- Width: Tapes that are about 1 inch wide have a longer standout of 8 to 12 feet. Narrow ones though, sit flatter and work better for laying things out.
- Measurement style: Many tapes show inches on the top edge and metric on the bottom. Some let you read numbers facing the right way no matter the side you’re on.
- Locking mechanism: For serious work manual locks stay durable longer compared to automatic spring locks.
- Accuracy: To ensure precise movement, look at the tang or hook. It must match the metal piece’s thickness .
Some woodworking tapes add neat touches like spaces to jot pencil notes built-in sharpeners for pencils, or scales to find the center that save you from doing math.
Kinds of squares and what they are used for
Squares help maintain precision in layouts and cuts. Woodworkers rely on them to achieve quality results. Some of the most popular types are:
- Speed square (also known as triangle or rafter square): Works great to mark 90-degree and 45-degree angles. It doubles as a guide when using a crosscut saw and checks if boards are square. Beginners buy this square first.
- Combination square: Comes with an adjustable ruler and head. You can use this tool to measure height, depths, check angles, or locate the center of round objects.
- Framing square: Its L-shape is handy on larger tasks. It’s often used to confirm squareness on big boards or to mark sheet materials.
- Try square: This square has a fixed 90-degree angle. People often use it in woodworking to ensure edges or corners are square.
Marking knives vs pencils
Woodworkers have long relied on pencils, but marking knives bring some unique benefits to the table.
Marking knives leave thin lines thinner than 1/64 of an inch, while pencils even the sharpest ones manage about 1/50 of an inch. This kind of precision makes it easier to know where to make cuts without any uncertainty.
They also give tool edges something to rest against. The knife’s edge makes a groove that tools like chisels and saws lock into. This helps start cuts with pinpoint accuracy.
Knives do more than just mark—they slice through wood fibers forming a clean edge that stops the wood from tearing during a cut. Pencils can draw and cannot create this protective barrier.
Using a marking gage to make joinery
Marking gages are key tools to make precise joinery like dovetails or mortise-and-tenon joints. They draw even lines along the edge of a workpiece. These lines help create strong -fitting joints.
There are three main kinds: wheel cutters, knife scribes, and pin gages. Wheel cutters make clean marks on wood cutting across or along the grain . Knife scribes handle cross-grain and end-grain marking without tearing the wood surface. Pin gages work best for marking with the grain.
When marking mortise-and-tenon joints, adjust the gage to match the width of your chisel. Then mark both pieces from their face sides. This way, the joints will fit together , no matter if they’re off-center.
To assemble a first set of basic woodworking tools, beginners need measuring and marking tools as a starting point. These tools lay the groundwork for learning and developing woodworking skills.
Essential Tools for Cutting and Shaping Wood
Cutting and shaping tools turn your measured and marked wood into completed projects. These tools play a key role in a woodworker’s beginner kit and allow careful detail and accuracy that power tools cannot always achieve.
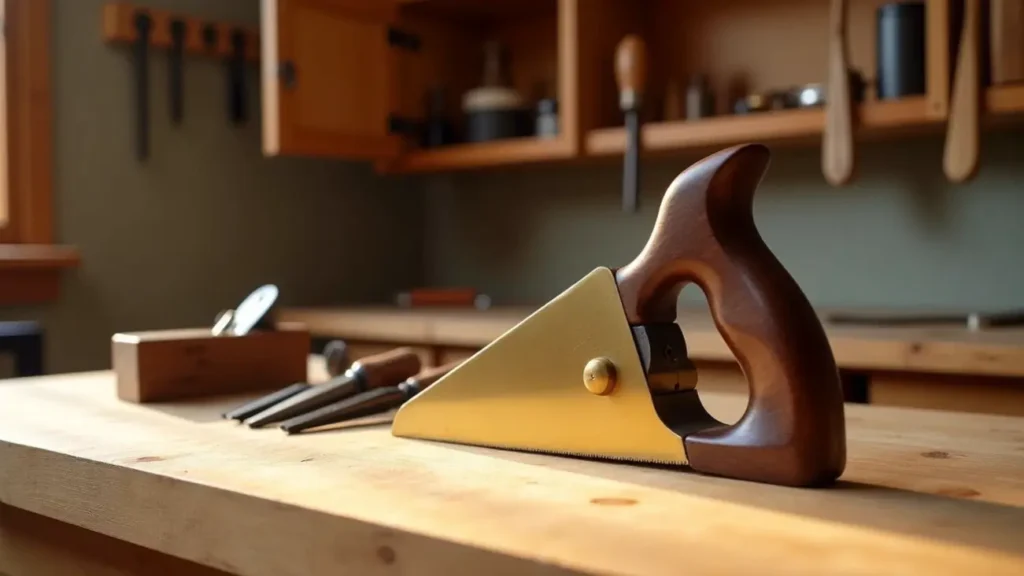
Picking the best hand saw
Even with all the advancements in power tools, hand saws remain a must-have for woodworking. Beginners need to know that there are two primary types of saws: Western ones that cut when pushing and Japanese ones that cut when pulling.

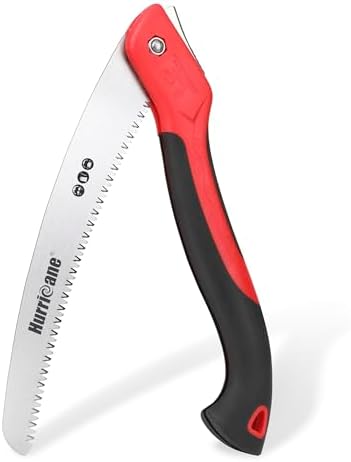

Japanese hand saws bring many perks to beginners. They cut on the pull stroke and come with very thin blades that allow for accurate and smooth cuts. The blades can be replaced . When a blade gets dull, you need to swap it out for a much cheaper price than buying a whole new saw.
To cover multiple uses, check out these key types:
- Dozuki: This saw has a stiff back rib and works well to cut dovetails and fine joints.
- Ryoba: It has ripping teeth on one edge and crosscut teeth on the other, which makes it handy.
- Crosscut saw: Made for cutting against the woodgrain, it has 8-11 teeth per inch.
- Ripping saw: Built to cut along the woodgrain and has 4-7 teeth per inch.
When choosing, look at teeth per inch (TPI). Blades with more TPI make smoother cuts but take longer, while fewer TPI cuts faster but leaves rough edges.
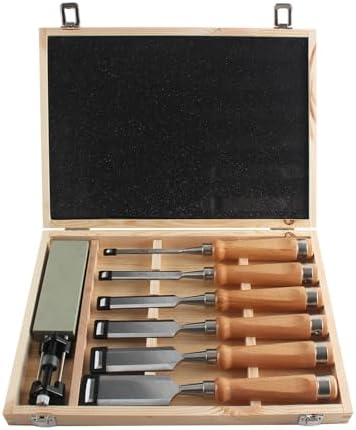
Chisel types and how to use them
Woodworking often involves precise work with chisels. Beginners should begin with bench chisels in two sizes (3/4″ and 1/4″) and add a mortise chisel to their tools.
Bench chisels work well as all-around tools. They are useful to chop, pare, and trim wood. Their beveled edges make them great at cutting joints like dovetails and mortise-and-tenon. Mortise chisels come with thick blades that are crafted to cut mortises. These mortises are deep square-shaped holes used to hold tenons in woodworking. On the other hand paring chisels have long and slim blades meant for detailed work. These chisels should never be hit with a mallet.
The type of handle also plays a big role. Tang handles where a pointed metal part fits into the handle, do not hold up well under hammering. Socket chisels however, can take constant hits from a mallet without much trouble.
How block planes help to smooth surfaces
Block planes work as crucial tools in a beginner’s woodworking kit. These compact tools measuring less than 7 inches, come with a low blade angle and have the cutter bevel pointing upwards.
Woodworkers use block planes to trim end grain, shape edges, and smooth spots where mill marks appear. The small size makes them easy to handle with one hand, which helps in tight spaces. They work well for planing end grain leveling joints, and tidying up small imperfections.
Low-angle block planes, with blades set at a 12° angle, perform especially well when working on end grain. When picking a block plane, find one with an adjustable mouth. This lets you close it for precise smoothing or open it for deeper cuts.
Sharpening tools help keep them effective
Dull tools can’t perform well, not even the pricey ones. So, beginners need to start with some basic gear to sharpen them.


A cheap option is the sandpaper method. Stick aluminum oxide sandpaper in different grits (#80 to #1,500) onto something flat like a glass sheet or an aluminum plate. If you’re sharpening chisels, begin with the flat back part then move on to the bevel. Use finer grits as you go.
You can also go with sharpening stones. Coarse stones (400-600 grit) can handle the first round of sharpening, while fine stones (2,000-3,000 grit) can finish the job.
Keep in mind that a sharp edge forms when two smooth flat surfaces meet at an angle capable of cutting wood with ease. Keeping this edge sharp can enhance how well your woodworking turns out.
How to Choose the Best Tool for the Task
Choosing the right tools to tackle woodworking projects takes careful thought and isn’t just about owning every tool you can find. Many seasoned woodworkers recommend avoiding the urge to buy tools just because you might need them .
Pair tools with specific project needs
Different approaches to woodworking call for using different tools. To make furniture, you need chisels and hand planes to handle joinery tasks, while carving projects often rely on specific gouges. Think about whether you’ll focus on making small decorative objects or bigger furniture items. Green woodworking, which involves unseasoned wood, has its own set of tools like unique carving implements.
Begin with a simple woodworking tool kit
If you’re new to woodworking, these basic hand tools provide a good starting point:
- A jack plane (like a Stanley #5) with two blades—one suited to rough cutting and one for smoothing
- A simple hand saw one that can handle ripping
- Three chisels in sizes 1/4″ 1/2″, and 3/4″
- A combination square to help with layout tasks
- A marking gauge to cut and mark joinery
This small selection of tools can tackle plenty of projects and help develop core skills. Over time, you’ll get a better sense of which extra tools will improve your work.
Skipping unneeded purchases
“Only buy the tools you need” sums up the smartest mindset a beginner can have. Focus on getting tools meant just to finish what you’re working on right now. Guessing what you’ll need later often leads to wasted money and a cluttered workspace. Many people regret grabbing fancy tools they touch, which end up gathering dust. Plus, owning too many tools too soon can make starting out more confusing and slow down how you pick up the basics.
Tips to keep hand tools safe and in good shape
Looking after your hand tools is just as critical as picking the right ones. Paying attention to how you store them keeping them sharp, and using them will help them work better and last a long time.
Keeping tools stored and cared for
Store your tools somewhere clean and moisture-free to avoid rust damage. I keep my woodworking tools in a cabinet or toolbox where neither dust nor humidity can get to them. Before putting them away, I wipe the tools down using an oily rag. Any kind of oil works well to block moisture.
To stay organized, making tools easy to see helps. Arrange them so you can grab them with just one quick motion. A slanted rack is great to hold chisels and planes, with small dividers between them. Most , clean your tools right after using them brushing off sawdust with a bench brush instead of blowing it away.
Sharpening basics to get started
Sharp tools keep you safer. , beginners face more risk using dull woodworking tools since they need extra pressure and might slip more . A sharpened chisel slices thin clear wood shavings instead of making fine dust.
To begin, the sandpaper method works as a low-cost option. Stick sandpaper with different grit levels to a flat surface and use finer grits . Keeping steady angles while sharpening is key to getting good edges.
Must-have safety gear when using hand tools
Using even the most basic woodworking hand tools requires attention to safety. They keep your eyes safe from debris and tiny particles. Wearing a mask or respirator helps you avoid breathing in harmful dust.
Staying safe goes beyond just wearing equipment. Key practices include:
- Always cutting with the blade facing away from yourself
- Clamping or securing your materials before working
- Staying on top of vaccinations like tetanus
- Keeping a well-stocked first aid kit nearby
Believe it or not
The riskiest tool in your workshop is a dull one.
Starting a woodworking hobby with hand tools brings new ways to create and ties us to a long history of skilled craftsmanship. This guide highlights the main tools every beginner needs to get started. Hand tools give more accuracy better control, and a closer connection to the material than machines can offer.
It’s better to prioritize good-quality tools than to own a large collection when getting started. Focusing on a small set of useful tools, like measuring tools basic cutting equipment, and key shaping items, will help more than buying fancy tools you may use. These simple but important tools help complete many projects while teaching essential skills.
You can’t ignore safety and maintenance when it comes to tools. Sharp tools not only work better but also tend to be less dangerous than dull ones. Storing tools the right way helps stop rust and keeps them usable longer. Wearing the correct safety gear is important to stay protected with every project you do.
Woodworking skills take time and practice to grow. The first things you make might not turn out perfect, but every saw cut, every joint you fit, and every surface you finish helps you improve. Some woodworkers still rely on tools handed down from older generations proving both the longevity of the tools and the lasting appeal of the craft.
Using hand tools in woodworking not develops useful skills but also offers a calming break from the hustle of modern life. Once you assemble your starter tools following this guide, you can start making projects to show off what you’re learning. The big moment is here—grab your first tool and dive into your woodworking journey.
Key Points
Learn the basics of choosing hand tools to build a strong woodworking base while keeping your spending and space under control.
• Begin with must-have measuring gear like a tape measure, squares, and a marking knife. Pair these with simple cutting tools such as a hand saw, three chisels, and a block plane to keep things practical and flexible.
• Hand tools give you better control and precision than power tools. This makes them a good choice to learn basic woodworking skills when you’re starting out.
• Keep tools sharp to stay safe. Dull blades need more effort and can slide around so get sharpening supplies as soon as you can.
• Buy tools based on the project you are working on instead of grabbing everything at once. This way, you save money, avoid clutter, and gain skills step by step.
• Store your tools in a dry spot and use oily rags to maintain them. These small habits can protect your tools from rust and make them last longer.
When building your first toolkit, focus more on quality than quantity. A well-chosen set of hand tools will not kickstart many projects but also connect you with the deep traditions of woodworking craftsmanship.
FAQs
Q1. What hand tools does a beginner woodworker need? Beginners should begin with some measuring tools like a tape measure, squares, and a marking knife. Cutting tools such as a hand saw and chisels are also crucial, along with a block plane. This basic setup helps you finish various projects while learning important skills.
Q2. Are hand tools a better option for beginners than power tools? For beginners, hand tools provide more control and precision and are also safer to use. They support learning important techniques, tend to cost less, and build a stronger connection to the craft.
Q3. How do I take care of my woodworking hand tools? Keep tools in a dry spot to avoid rust. Clean them after every use and rub them with an oily cloth before putting them away. Use sharpening stones or sandpaper to keep cutting tools sharp. Taking care of your tools makes them last longer and work better.
Q4. What safety steps should I follow when using hand tools? Always use safety glasses and a mask to keep your eyes and lungs safe. Secure your materials , cut away from yourself, and keep all tools sharp. Have a first aid kit ready and make sure your tetanus vaccination is current.
Q5. How can I pick the right hand tools to use in woodworking? Focus on tools that fit the projects you are working on instead of purchasing a lot at once. Begin with basic tools that suit the kind of woodworking you do, like carving or furniture building. As you work more, you will realize what extra tools will help improve your skills.