
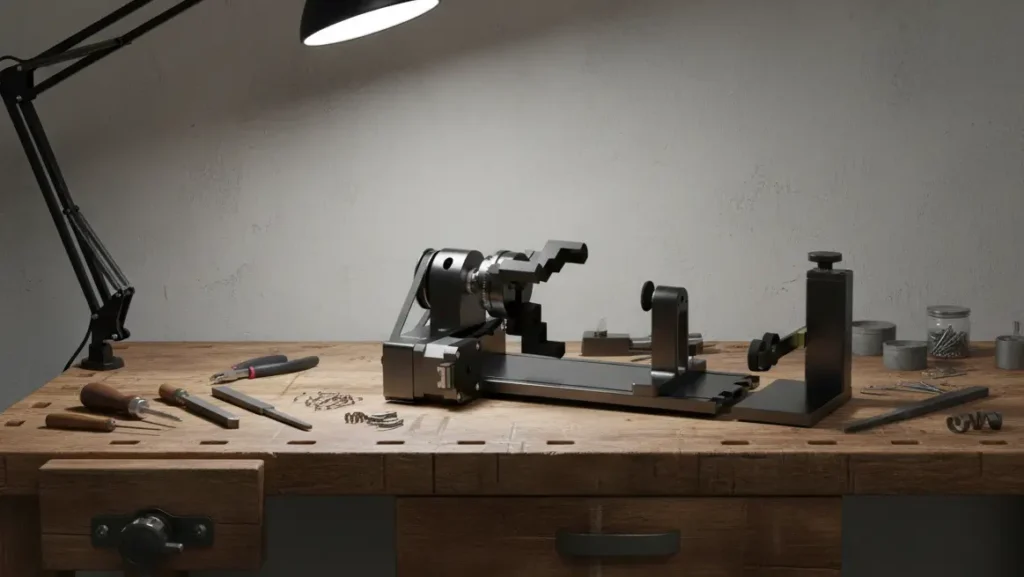
The xTool RA2 Pro rotary attachment has changed the way I use my laser engraver. It provides so many setup options for various types of projects. After weeks of trying it out on six different machines and materials, I’m ready to share what I think about it.
Some of the links on this website are affiliate links, which means I may earn a small commission if you make a purchase through them — at no extra cost to you. I only recommend products that I genuinely believe in, and my opinions are always honest. This is my way of keeping the site running while sharing helpful recommendations with you.

- Suitable for 90% Daily Use Cylindrical Objects – xTool RA2 Pro is the WORLD’S FIRST 4-in-1 laser rotary attachment, incl…
- Higher Speed and Accuracy Engraving – RA2 Pro Laser attachment can hold the object tightly with a soft-pad covering jaws…
- Wide Compatibility – RA2 Pro is compatible with xTool S1, F1, F1 Ultra, P2, D1 Pro, M1 Ultra, and most laser engravers o…
When I opened the box for the xTool rotary attachment, I noticed right away how solid and well-built it felt. The kit even included sturdy milled aluminum risers, which looked high-quality. But I found out that to use this tool, you have to raise your entire laser machine by about 90mm, which adds a bit of extra setup time. On the bright side, the RA2 Pro can work with other laser diode brands too, not just xTool machines. It’s a handy add-on that lets you engrave items like glasses, mugs, tumblers, rings, and ornaments giving you tons of options to get creative.
Is this the tool that makes your xTool laser engraver “10x better” as some people say? I got my hands on the RA2 Pro to figure out whether it’s worth adding to your workshop or not.
What is the xTool RA2 Pro and Who Should Use It?
The xTool RA2 Pro claims to be the world’s first 4-in-1 rotary attachment made for laser engravers. Unlike standard rotary attachments, it gives the ability to switch setups. This means it can handle objects of various shapes and sizes with better accuracy.
4-in-1 Rotary Setup Options: Roller, Chuck, Sphere, Ring
The RA2 Pro stands out because its design works for any round or cylindrical item. It offers these four specific modes:
- Roller Rotary: Works well with uneven cylinders and very long objects.
- Chuck Rotary: Suits items that have either curved or flat bases.
- Sphere Rotary: Handles spheres with diameters from 25 to 100mm.
- Ring Rotary: Engraves rings with sizes ranging from 11 to 70mm.
The design of this device stands out with its remarkable engineering. It includes a stepper motor that offers precise control at 0.45 degrees and can reach an angular speed of up to 360 degrees every second. The engraving diameter depends on the mode being used. In roller mode, it can work with items measuring between 3mm and 198mm in diameter, while in chuck mode, it manages objects with a diameter of up to 100mm.
Works with: D1 Pro, S1, F1, M1 Ultra
I found that the RA2 Pro works well with almost all xTool laser engravers. It’s supported by machines like the xTool D1, D1 Pro, S1, F1, F1 Ultra, P2, and M1 Ultra as well as other open-structure laser engravers. One thing to note is that if your machine doesn’t come with built-in risers, you’ll need to adjust its height since the rotary requires about 90mm of space underneath the laser.
Who It’s Best For: Hobbyists and Small Business Owners
Based on my experience, the RA2 Pro is intended for two kinds of users. First are hobbyists aiming to broaden their creative projects. It can handle all cylinder and sphere items you might use . Second are small business owners who want to make custom products to sell.
The xTool RA2 Pro turns an ordinary laser engraver into a versatile tool for various projects. I’ve used it to make custom wine glasses for weddings unique pieces of jewelry, and engraved tumblers. None of these would have been possible without a rotary attachment. Its setup is fairly easy, and it adds great value to those looking to enhance their engraving options.
How to Set Up and Configure the xTool RA2 Pro
You need to pay close attention to detail when setting up the xTool RA2 Pro. When I first set mine up, I noticed a few things that might be helpful for other laser users.
Opening the Box and Checking for Missing Items
When I opened the box, which measures 460×182×95mm, I discovered the rotary attachment and a variety of accessories inside. The RA2 Pro package comes with roller parts for its standard mode and chuck parts designed for more specific tasks. Key components are the adjustable roller module, chuck parts, and a tail module used to engrave spheres. Some people mention missing the tail stock parts, so it is important to check everything as soon as you unbox it.
Adjusting Height with Risers
Before attaching the RA2 Pro to your laser cutter, you need to lift the machine by using risers. This step is important because the rotary system requires around 90mm of space underneath. The risers are built with three distinct sides (α, β γ), each suited to specific material sizes:
- Side α is suitable to handle materials with perimeters between 0 and 88mm.
- Side β is made to work with materials having perimeters of 88-220mm for RA2 or 0-142mm for the RA2 Pro.
- Side γ accommodates materials with perimeters of 220-299mm for RA2 or 142-314mm for the RA2 Pro.
Calculating the perimeter of your object helps you figure out which side of the risers should stay up. Many beginners often miss paying attention to this small but important detail.
Lightburn Settings: Roller or Chuck?
Setting up Lightburn is key to getting things to work . In chuck mode, the steps needed for one full rotation stay constant at 128mm. For roller mode, enter 32mm as the steps per rotation and set the roller diameter to 17mm. When working with the xTool D1 (non-Pro), make sure to set the Rotary Axis to Z-Axis. If you are using the D1 Pro, remember to set it to the Y-axis instead.
One mistake people make is to skip pressing “OK” in the Rotary Setup window before starting their engraving project.
xTool RA2 Pro Manual PDF: How to Access It
You can access the detailed guide for the RA2 Pro from xTool’s support website at support.xtool.com. The site also offers extra resources like video guides that explain all four rotary modes: roller, chuck, ring, and sphere.
Hands-On Tests with 6 Unique Objects
Once I set up the xTool RA2 Pro, I tested it on six various items to check how well it performs on different shapes and materials.
1. Steel Cup with Paint
During my first test, I assumed I was working with an anodized aluminum cup, but it was steel with a thin paint layer. Even though I got it wrong, the engraving process still worked pretty well. Getting the cup level took some time and patience at the start. Once I had it set up , the engraving came out looking sharp and clear. After giving it a good wash, the final result stood out with solid contrast on the painted exterior.
2. Stainless Steel Tumbler
I used the RA2 Pro next to try engraving a stainless steel tumbler. I wasn’t sure how well it would work. , it turned out a lot better than the painted cup I had tried before. First, I adjusted the diameter and made sure the tumbler was positioned . It took me two tries to get it right, but the third attempt came out flawless. To clean it up, I grabbed a paper towel with some rubbing alcohol and wiped away the laser soot.
3. Ballpoint Pen
Afterward, I tested the RA2 Pro by using a stainless steel ballpoint pen to check how it performed on smaller objects. This task was challenging because the pen’s surface is round without any flat edges. Even though it was tough, I got a decent result. I think I could improve it further with more time and adjustments to the setup.
4. Christmas Ornament
To try out a seasonal project, I engraved a Christmas ornament using the sphere mode. I needed to pick the SVG file type to get sharp engraving results and set the software to “LASER CYLINDRICAL” mode. One important step was clicking “reflect ” so the image would look right once engraved. The process turned out smooth, but the time it took to engrave changed based on how complicated the design was.
5. Tea Cup with Handle
The chuck’s rotary mode was super helpful when dealing with this uneven cylinder. The soft-pad jaws held the cup but without scratching it. I liked having both single-step and double-step jaws to use. The double-step ones were pretty handy because they could be installed in different ways, with the steps pointing inward or outward. This made it easier for the chuck to handle items as wide as 100mm.
6. 5-Inch CNC-Made Spice Well
In the end, I tried out a spice well with a 5-inch diameter that I made using my CNC machine. It was a really tight fit under the laser head. If I had raised the rotary attachment any more, it wouldn’t have been able to pass under the laser. Even with this issue, the chuck offered much better stability than using rollers. In my experience, the chuck and jaws give more precise results because objects on rollers can move around if they aren’t round.
Useful Tips Advantages, and Drawbacks
I’ve worked on lots of projects using the xTool RA2 Pro, and I’ve learned some helpful things about this adaptable add-on.
Roller Versus Chuck: Which One Offers Better Precision?
From running many tests, I found the chuck and jaws deliver way better accuracy than rollers. Sometimes, objects on rollers shift up or down if they’re not round. This leads to uneven lines or distorted images. On the other hand, the chuck grips the workpiece and super , so it stays still while engraving. This brings excellent steadiness.
Using Grids to Center and Align
Getting everything lined up was tricky at first until I found some special tools for alignment. Etsy offers a popular grid that comes with pre-marked alignment spots tailored to different RA2 Pro setups. There are also third-party center guides that remove the need to guess when positioning mugs or tumblers.
To engrave tumblers , I suggest turning on the Auto-Snap option in XCS and adding a reference line in the center. This method helps create a perfect match with existing logos on tumblers and makes them look super professional.
Mistakes People Make and How to Fix Them
I often messed up by forgetting to hit “OK” in the Rotary Setup window before starting an engraving. Also when I used chuck mode on uneven shapes like cones circular patterns sometimes looked squished into ellipses. To solve this, you should measure the lengths of two arcs on the material and tweak the pattern to match.
One more mistake I made was not setting the flame alarm in xTool Creative Space to “LOW,” which caused pretty annoying false alarms during my rotary practice sessions.
Organizing Storage and Parts
To keep the Y-axis consistent, you should draw some Sharpie lines on both the frame and the gantry. This little hack helps you get back to your center point (Y=200) even if the rotary attachment gets disconnected.
What Could Be Better in Future Models
From what I’ve seen adding a “top dead center” mark on the chuck could make the RA2 Pro much easier to use in the future. Also, having pre-drilled holes on the rotary board would remove the hassle of using weighted counterbalances, making mounting more stable and secure.
Final Thoughts
After weeks of trying it out on six different machines and various objects, the xTool RA2 Pro rotary attachment delivers on most of its claims. This 4-in-1 tool adds a lot of flexibility to a typical laser engraver enabling me to work on projects that wouldn’t have been achievable otherwise.
This attachment stands out because you can switch between roller, chuck, sphere, and ring modes. Hobbyists and small business owners find it useful. When precision is crucial, chuck mode works way better than the roller setup. The chuck keeps objects steady during engraving, but rollers can sometimes cause items to move if they aren’t round.
Setting it up is tricky and takes some patience especially with height adjustments. You need to place the included risers properly to fit your material’s size so double-check that before you start. Also, make sure to hit “OK” in the Rotary Setup window before every job. Forgetting this step can lead to a lot of unnecessary headaches.
The RA2 Pro managed to work through all test items , although every piece needed its own setup tweaks and figuring out. From engraving designs on steel tumblers to working on fragile Christmas decorations, its results stood out once I learned to use the right settings.
The tool works well, but a few small changes could make future designs even better. Adding a “top dead center” mark on the chuck could make alignment easier. Including pre-drilled spots for mounting could remove the hassle of using counterweights. These little issues however, feel minor compared to all the creative things the device makes possible.
The xTool RA2 Pro is a big step up for any laser engraver it works with. While it takes time to learn, this tool expands what your machine can do. People who put in the effort to learn its features will end up making high-quality engravings on a wide variety of round and curved objects.
Key Points
After testing it on six machines and objects, these are the main things to know about the xTool RA2 Pro’s rotary attachment:
• Chuck mode offers better precision than roller mode – it keeps objects steady and prevents movement during engraving giving accurate results every time.
• You need to adjust the machine height by 90mm to set it up . Use the risers that come with it and make sure to position them based on the size of your material’s edges.
• This works with lots of laser brands, not just xTool. It supports models like D1 Pro, S1, F1, M1 Ultra, and other open-structured laser engravers.
• It offers four different modes to suit various projects: a roller for odd-shaped cylinders, a chuck to keep things steady, a sphere option for ornaments, and a ring setting for engraving jewelry.
• Always hit “OK” in Rotary Setup before starting a job. Turn the flame alarm to “LOW” to avoid issues while working.
• Getting professional results takes time and effort. You’ll need to tweak settings for different materials, but the time spent learning will pay off in the end.
The RA2 Pro changes regular laser engravers into flexible tools in a workshop. It lets users make high-quality engravings on round and curved items. It might take some time to learn, but those who understand its different modes can discover endless ways to use it for creative hobbies or small business needs.